How to Recover Images from Cameras

When you deleted the photos from camera, the photo itself is not deleted and still existed; instead, system will only set the space as free when new picture is taken, so that this space can be used to save the new picture.


So it is very important to NOT take any more pictures after the accident. Because new picture may overwrite the space of deleted photos, which will make them unrecoverable.

If you deleted them by accident, you can find them in your Recycle Bin. You can easily retrieve them easily.

But if you deleted them and emptied the Recycle Bin, it becomes a little troublesome. You’d better choose recovery software to restore the images automatically for you as you can not recover yourself. It is too difficult for common people especially those computer novices.

It is strongly recommended that Wiserecovery is your first and best choice.

WiseRecovery is easy-to-use data recovery software that recovers lost and deleted data from hard drive or other storage media due to deletion, corruption or formatting of any storage device. It helps in cases of hard drive corruption or formatting, virus attack, malfunction etc. Every day, WiseRecovery helps hundreds of users recover their lost or deleted data. It supports 600+ file formats; almost all file system (FAT, NTFS, HFS, UFS, exFAT) WiseRecovery is everything you need to get lost data back.

User First, Product Excellent, Brave in Innovation and Never Stop Improving” is Lionsea principle. The unconditional 60 days money back guarantee is applicable to all orders. So you can feel relieved.

How to Recover Images from Camera?

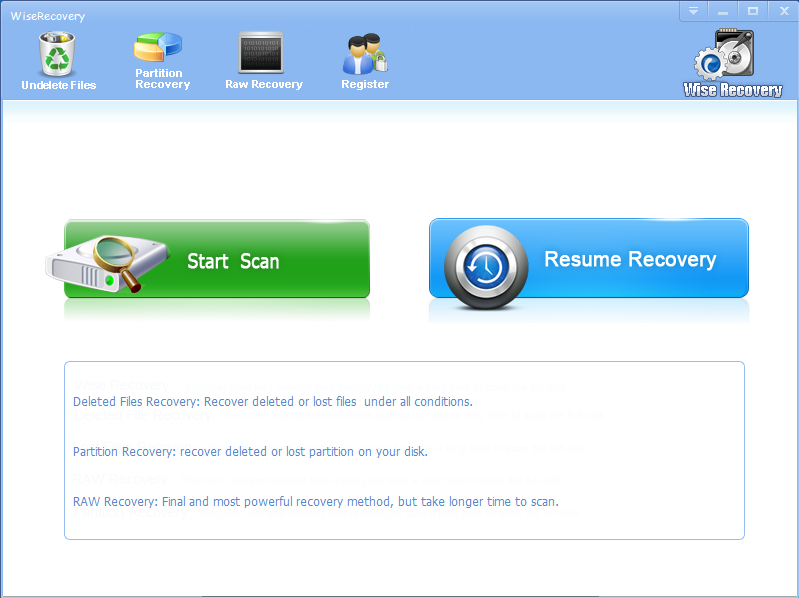
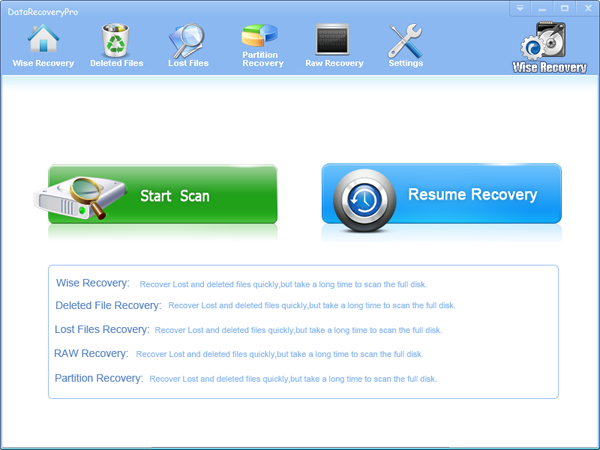
Step 1: Download WiseRecovery Data Recovery Software, install it and launch it. Click the “Start Scan” button on the main window of Data WiseRecovery.

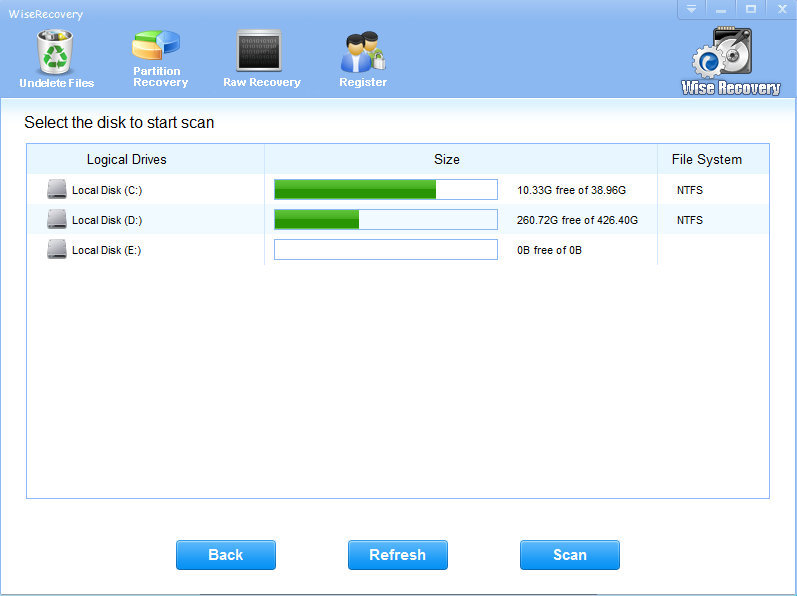
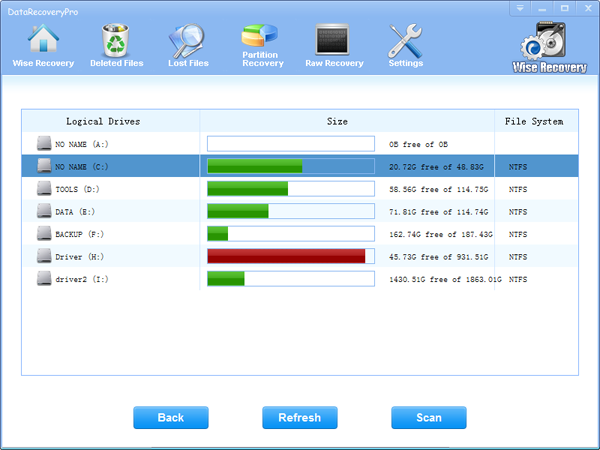
Step 2: You can see the list of all volumes found on your computer, select the exact drive and click the “Next” button to start scanning. If you can’t see the drive, please make sure your external drives are connected, and click ‘Refresh’ button.

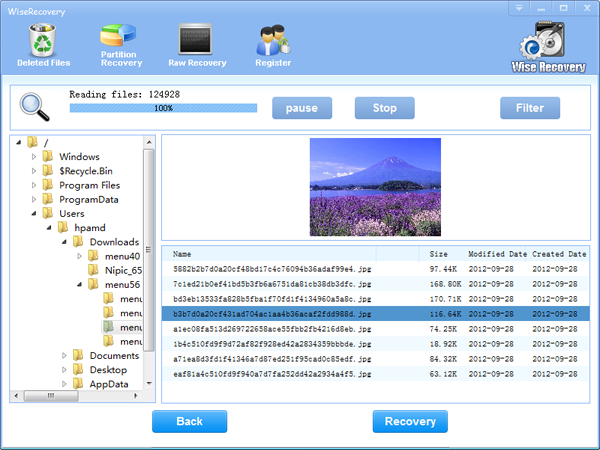
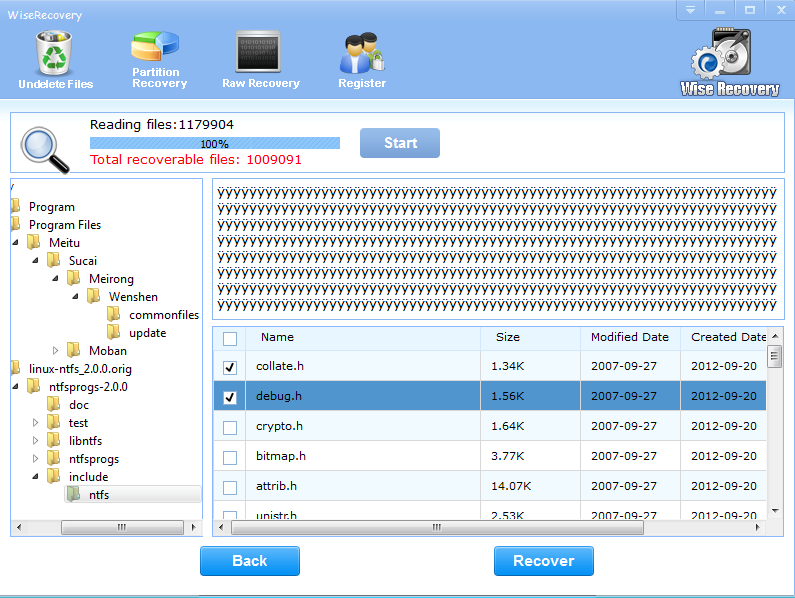
Step 3: It will take about 2-10 minutes to scan, it depends on your disk size and files amount on the disk. After scanning is finished, you can preview text document and picture files.

How to Recover Lost files from a CF Card

CF Cards are unique memory storage devices that can be used on camera, cell photos, PCs and other electronic devices. The “CF” stands for “Compact Flash”. The flash memory card showcases in a variety of Megabyte or Gigabyte capacities. You can use it to store different kinds of data files on any of the electronic devices that can support it. If you mistakenly delete files from the card, there’s no need to panic. You can always recover such files if you didn’t format the card in any way. Here are some tips for you.

Data recovery can be a difficult task. It should be mentioned that loss of data is not always due to users’ fault. Sometimes, the most common causes are power supply shutdowns, internet connection malfunctions and physical damages of a hard drive. The latter case is the most challenging. The best option is to do nothing. If you try to recover data by yourself and fail, it will be impossible to recover the data even if experts and specialized companies are in charge. Therefore, if you are not sure you can deal with such a task, find a professional software.


WiseRecovery can recover your files without paying that much.


WiseRecovery is a good choice. WiseRecovery is a powerful data recovery software which can help you recover almost all kinds of data loss. With it your files, photos or important documents are safe even if there is something wrong with your computer.


How to do raid recovery with WiseRecovery


  • 1. Download Wisereocvery. Run WiseRecovery software, and click on Start scan.
  • 2. Choose the drive to start scanning.
  • 3. Now, the scanning process will commence. After scanning, list of file types will be displayed in the left pane.
  • 4. Click each file type to view files in it. You will see thumbnails when you click on the file type.
  • 5. You can either recover all or selected files by clicking the Recovery button.


Professional Data Recovery Software, Recover Lost or Deleted Files in 3 Steps


Howo to Recover Deleted Image Files

Anyone who’s ever used a computer for any length of time has experienced the stomach-dropping sensation of losing an important file through bad karma or injudicious use of the Delete key. Sometimes, though, what’s lost can be found again. To recover your lost image files, the most important thing is to find the best recovery tool. But before that, you can try to recover the files by yourself.

Please follow below steps to recover your deleted images:

  • 1. Double-click on the Recycle Bin in Windows or the Trash on a Mac to see if the file is still there.
  • 2. If you find the file, drag it to the desktop. To return the file ddd-down menu.
  • 3. If the file is no longer in the Recycle Bin or the Trash, look for a backup. If your PC is on a network that has regular backups, check with the system administrator to see if it’s possible to retrieve a saved copy of the file.
If you have emptied the files in recycle bin, then you have to use a recovery software.Because normal ways of recovering lost files cannot work at this time. How to choose a good recovery software. First, you need to check about the reviews of the software. If most people say good points of this software, then it will work for you. Second, download the trial version to have a try. If you can see recovered files with trial version, then the software will really work for you. Then you can buy and recover.
WiseRecovery is the best file recovery software which recovers lost files with easy operation. It has fast recovery speed and best recovering quality. So, please follow below steps to recover lost images:
  • 1. Run WiseRecovery software, and click on Start scan.
  • 2. Choose the drive to start scanning.
  • 3. Now, the scanning process will commence. After scanning, list of file types will be displayed in the left pane.
  • 4. Click each file type to view files in it. You will see thumbnails when you click on the file type.
  • 5. You can either recover all or selected files by clicking the Recovery button.
See if your files can be recovered? Happy with the recovery results? WiseRecovery really can do a good job in recovering lost images, video files, audio files, ect. It can always do a good job to help you recover lost files.

How to Recover Deleted Files from Recycle Bin

Recycle Bin is a place to store your currently deleted files. When you delete some files, actually they are not deleted permanently, but in your Recycle Bin. So if you didn’t empty your recyclebin, the deleted files can be back very easily. But if you empty Recycle Bin, the files will disappear and you cannot get them back in normal easy way. So the best way to get the files back is to use a data recovery software.


WiseRecovery is adept at recovering deleted Recycle Bin files:

WiseRecovery is the best recovery software that can help you recover erased photos, video files, music, emails and other multimedia files from your computer hard drive, SD card and other storage media. It works very efficiently and can do a good job in recovering lost files of all kinds. After recovery, WiseRecovery will take you to the destination folder where the recovered files are stored. WiseRecovery has a simple working system. You don’t need to be a professor of computer, and just in a few minutes you will get the erased files back.


Why choose WiseRecovery?

  • 1. WiseRecovery supports all common file formats, including Image, Video, Music, Document, Emails and Archives. You can recover every kind of files due to any reason.
  • 2. WiseRecovery supports all situations of file lost, such as accident deletion, formatting, device corruption, etc.
  • 3. Support all digital devices, such as hard disk, SD card, memory stick, raid, and other multimedia device.
  • 4. Support all file systems, FAT, Windows exFAT, Linux, RAID.
  • 5. WiseRecovery can fix all the error messages given by all the digital devices.


With so many good points, WiseRecovery receives much population among people all over the world. When people deleted files from recycle bin, they will turn to WiseRecovery for help. So what are you waiting for? WiseRecovery is right here for you. Please follow below steps to recover recycle bin files:

  • a. Run WiseRecovery software, and click on Start scan.
  • b. Choose the drive to start scanning.
  • c. Now, the scanning process will commence. After scanning, list of file types will be displayed in the left pane.
  • d. Click each file type to view files in it. You will see thumbnails when you click on the file type.
  • e. You can either recover all or selected files by clicking the Recovery button.


How to Recover Corrupted Files Easily

File corruption is a very common and serious problem for computer users. When a file is corrupted, you cannot use or view it any more. In other words, the file is no longer useful. But sometimes, the corrupted file is really important to you, and you have no other back-up version. This is the worst situation. If you are the unlucky one to have corrupted files, you need to find ways to figure out the problem. The best way to fix the problem is to find a recovery program.

WiseRecovery, data recovery software has special function to recover your corrupted or lost files. It performs very quick scanning and recovering process, the recovered files will be on your computer or SD card again in just a few minutes. After recovery, the recovered files will be displayed in the main window of WiseRecovery. You can select the one you want to recover or recover all of them. It is very easy to use and risk free. It is the best tool for you to recover the corrupted files.


What other situations WiseRecovery supports:

  • a. Hard Drives that have been formatted.
  • b. Partition structures are damaged or deleted.
  • c. Recover deleted or lost files emptied from the Recycle Bin.
  • d. Accidental file deletion.
  • e. Damage due to a power failure or surge.
  • f. Corrupted or missing critical file system structures.


What can WiseRecovery do to recover your corrupted files?

WiseRecovery can recover the files in the situation of accident deletion, file corruption, accident formatting, disk corrutption, etc. So, corrupted files can be recovered by WiseRecovery very easily, you don’t need to worry about doing any damage to your system or computer. WiseRecovery just performs read-only operation. Your original files will not be damaged. And the recovery process is very fast.

  • 1. Download WiseRecovery Data Recovery Software, install it and launch it. Click the “Start Scan” button on the main window of DataWiseRecovery.
  • 2. You can see the list of all volumes found on your computer, select the exact drive and click the “Next” button to start scanning. If you can’t see the drive, please make sure your external drivesare connected, and click ‘Refresh’ button.
  • 3. It will take about 2-10 minutes to scan, it depends on your disk size and files amount on the disk. After scanning is finished, you can preview text document and picture files.
  • 4. Select the files or folders that you want to recover and press the “Recover” button, on the popup window, please select target directory to save the recovered files. WiseRecovery will recover files instantly. Now you can click ‘open the destination directory’ button to see the recovered files!


How to Restore Deleted Drivers

Accidentally deleting drivers you need can cause problems. Hardware won’t function properly–or at all without the drivers needed to run it. In many cases, finding the drivers you need can be difficult, especially if you don’t have an installation CD. Using System Restore can undo the driver deletion, because a restore point is created every time you change something on your computer.

Method A:

  • Save your work and close all programs. You will be restarting your computer during the process.
    Click “Start” from the task bar and then choose “All Programs.”
    Click “Accessories” from the program menu. Choose “System Tools” from the side pop-out menu and then select “System Restore.”
    Click “Restore my computer to an earlier time” from the Welcome screen. Click “Next” at the bottom.
    Choose a date in bold from the calendar shown on the Restore Point page. The date that you choose should be an earlier one, like a day or two before the deletion occurred. Click “Next” at the bottom of the window.
    Click “Next” on the next page. The restoration begins, and your computer will restart.
    Click “OK” from the completion window that appears when your computer loads again.

Method B:

Wiserecovery is an excellent recovery program. There are three recovery modules on the main window of the interface:

  • Download WiseRecovery Software, install it and launch it. Click the “Start Scan” button on the main window of WiseRecovery.
  • You can see the list of all volumes found on your computer, select the exact drive and click the “Next” button to start scanning. If you can’t see the drive, please make sure your external drives are connected, and click ‘Refresh’ button.
  • It will take about 2-10 minutes to scan, it depends on your disk size and files amount on the disk. After scanning is finished, you can preview text document and picture files.
  • Select the files or folders that you want to recover and press the “Recover” button, on the popup window, please select target directory to save the recovered files. WiseRecovery will recover files instantly. Now you can click “open the destination directory” button to see the recovered files!
  • Note: Please don’t recover the file to the disk you are recovering files from!

Method C:

  • Download & install DriverTuner.
  • Click the down arrow button on upper right interface and choose to enter license.
  • Scan for new drivers.
  • Click download (just download drivers you want, you don’t need to download all drivers)
  • After download completed, click ‘setup’ button to install it.
  • Reboot computer.

http://www.lionsea.com/

How to Recover XLS Files

Microsoft Excel is a necessary program with which you can create detailed spreadsheets and colorful charts. Excel is as important as Word and Outlook. Nothing is more annoying than realizing you’ve forgotten to save an excel file which is really important. Unpredictable power off or software crash are often the culprits that cause. However, if an XLS file is damaged or corrupted, all of the important data could be lost. Fortunately, Microsoft Excel has an Autosave feature that can save it automatically every few minutes. If you cannot open an XLS file or it  closes immediately after opening, you can use Excel’s tools to try to recover it and save crucial data.


Method A:


  • Start Excel. Click the “File” menu or the “Office” button and select “Open.”
  • Find the file that is not working correctly in the “Open” window. Click on it once to select it. Click the arrow next to “Open” and select “Open and Repair.”
  • Click “Repair.” This option will attempt to repair and open the complete XLS file as close to the original format as possible.
  • Close the Excel window and reopen it if the repair did not recover the XLS file. Go back to the “Open” window and click on the file. Click the drop-down arrow to the right of “Open” and click “Open and Repair” once more. This time, click the “Extract Data” button.
  • Select “Recover Formulas” to recover as much of the file as possible. If this does not work, go back and choose “Convert to Values.” If the last option is the only one that recovers data from the file, you may have to format the data and insert formulas again.


Method B:


If Method A cannot help you to recover it, you can try a professional data recovery program. I recommend Wiserecovery to you. It is a top ranking program which has great reviews.

  • Download WiseRecovery Software, install it and launch it. Click the “Start Scan” button on the main window of WiseRecovery.
  • You can see the list of all volumes found on your computer, select the exact drive and click the “Next” button to start scanning. If you can’t see the drive, please make sure your external drives are connected, and click ‘Refresh’ button.
  • It will take about 2-10 minutes to scan, it depends on your disk size and files amount on the disk. After scanning is finished, you can preview text document and picture files.
  • Select the files or folders that you want to recover and press the “Recover” button, on the popup window, please select target directory to save the recovered files. WiseRecovery will recover files instantly. Now you can click ‘open the destination directory’ button to see the recovered files!
  • Note: Please don’t recover the file to the disk you are recovering files from!

http://www.lionsea.com/

How to Recover AVI Files

About AVI:

Audio Video Interleaved (also Audio Video Interleave), known by its initials AVI, is a multimedia container format introduced as part of its Video for Windows technology. AVI files can contain both audio and video data in a file container that allows synchronous audio-with-video playback. Like the DVD video format, AVI files support multiple streaming audio and video, although these features are seldom used.

Have you ever lose an AVI file? The following scenarios are the possibilities of AVI files loss:

1. Accidentally deleting AVI files or folders.
2. Accidentally formatting AVI files player or other storage media.
3. Digital recorder or camcorder memory card error.
4. Disconnecting memory card while reading or recording AVI files.
5. Corruption of the hard disk.
6. Your computer might be attacked by viruses.
7. Other reasons.

You will thank Lionsea to create wonderful software called Wiserecovery. It can do almost all kinds of recovery such as lost file recovery, unformatted disk recovery, Recycle Bin recovery, corrupt Hard Disk recovery and so on.

Then how to recover AVI files?

It is not difficult as you think. Just 3 steps to do the recovery:

  1. Download WiseRecovery Data Recovery Software, install it and launch it. Click the “Start Scan” button on the main window of Data WiseRecovery.
  2. You can see the list of all volumes found on your computer, select the exact drive and click the “Next” button to start scanning. If you can’t see the drive, please make sure your external drives are connected, and click ‘Refresh’ button.
  3. It will take about 2-10 minutes to scan, it depends on your disk size and files amount on the disk. After scanning is finished, you can preview text document and picture files.

So many customs have used our product and give 100% satisfaction.What are you waiting for? Just do it!

How to Recover Formatted Disk with WiseRecovery

Disk formatting will cause so much trouble for computer users. Because all the important files you stored in are missing. You don’t know what to do and how to recover them. But with the progress of technology, there is a way to get them back. WiseRecovery is such a recovery tool which  recovers all your lost files, such as images, video files, audio files, emails and other common file formats. No file will be corrupted after recovery. The process is very fast and you don’t need to worry about any data loss.

What can lead to disk corruption?

  • a. Virus attack or computer malware attack.
  • b. Sudden power failure or surge.
  • c. Unexpected shut down or application failure.
  • d. Other unknown reasons.

Recover lost data from formatted disk with WiseRecovery:

WiseRecovery recovers data from almost all the digital devices, especially can do a good job for hard disk recovery. It is a professional data recovery tool developed by high-tech engineers with advanced coding technology. WiseRecovery recovers deleted or formatted data within a few minutes compared with other recovery software. And it also can do a partition recovery if you couldn’t find the partition. Raw recovery is another feature possessed by WiseRecovery.

WiseRecovery supports wide range of file formats:

  • 1. Common Picture Formats: JPG JPEG TIF
  • 2. Common Video Formats: AVI MPG MOV MPEG ASF MP4 3GP MTS
  • 3. Common Audio Formats: MP3 WAV
  • 4. RAW Image Formats: Nikon NEF, Canon CRW and CR2, Kodak DCR, Konica Minolta MRW, Fuji RAF, Sigma X3F, Sony SRF, Samsung DNG, Pentax PEF, Olympus ORF, Leica DNG, Panasonic RAW and more.

How to recover lost files on hard disk with WiseRecovery:

  • 1. Download WiseRecovery Disk Recovery to your PC. Install it and launch it. Click the “Start Scan” button on the main window of WiseRecovery.

  • 2. You can see the list of all volumes found on your computer, select the exact drive and click the “Next” button to start scanning. If you can’t see the drive, please make sure your external drives are connected, and click ‘Refresh’ button.

  • 3. It will take about 2-10 minutes to scan, it depends on your disk size and files amount on the disk. After scanning is finished, you can preview text document and picture files.

  • 4. Select the files or folders that you want to recover and press the “Recover” button, on the popup window, please select target directory to save the recovered files. WiseRecovery will recover files instantly. Now you can click ‘open the destination directory‘ button to see the recovered files!


How to Restore Lost Audio Files

Audio Files contains many different kinds of format. People store their favorite music and record into their phones, mobile devices and computers. However, many people become panic when their audio files are lost.

People may have deleted their songs from their music files. Sometimes, you may delete your audio file from your computer. No matter what situation you encounter, it’s upsetting to lose the audio files. Because you have stored the music for a long time and you pick it up carefully.

Don’t worry. There’s still possibility to recover your audio files. When the audio files are deleted, it doesn’t mean that your files are erased from your computer forever.

Do as the following steps and you can restore your audio files.

1. Download WiseRecovery Data Recovery Software, install it and launch it. Click the “Start Scan” button on the main window of Data WiseRecovery.

2. You can see the list of all volumes found on your computer, select the exact drive and click the “Next” button to start scanning. If you can’t see the drive, please make sure your external drives are connected, and click ‘Refresh’ button.

3. It will take about 2-10 minutes to scan, it depends on your disk size and files amount on the disk. After scanning is finished, you can preview text document and picture files.

Note:If you are not able to get the desired results after Deleted File Recovery, go back to home window and select the option “RAW Recovery” or “Partition Recovery “.

4.Select the files or folders that you want to recover and press the “Recover” button, on the popup window, please select target directory to save the recovered files. WiseRecovery will recover files instantly. Now you can click ‘open the destination directory’ button to see the recovered files!

Note: Please don’t recover the file to the disk you are recovering files from!