How to Recover Lost Word Files from Computer Hard Disk


People who work in office must use the word document everyday to store important data or edit any necessary document. But sometimes we are not accustomed to saving the file every time we finish an editing. Sometimes, we may encounter a computer shut down or system file corruption. Then the result is that the word document is lost or cannot be opened any more. Do you regret not saving the file instantly? But regret cannot help you get the word files back.


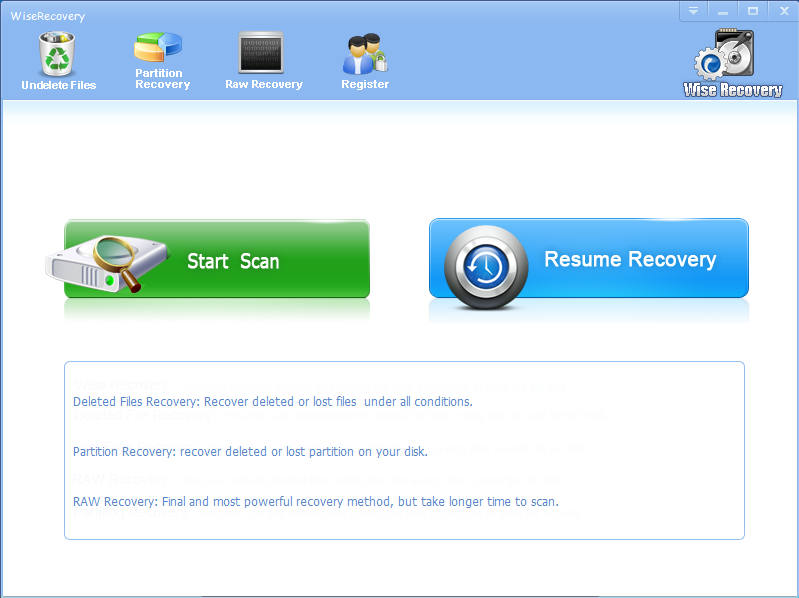
In this situation, many people choose to restart the work and do the job one more time. This is really time consuming. And you may lose some original ideas. This is a bad thing. Actually the lost word files can be recovered with some methods. Nowadays, some software company are trying to develop data recovery tool to help users recover their lost files.One of them is WiseRecovery. It is developed by top engineers of computer technology. Many people have got back their important data with WiseRecovery.


Why choose WiseRecovery?

  • Recover word files with original data.
  • Recover pictures with original dimension.
  • Image formats supported: JPEG,BMP, GIF87a, GIF89a, TIFF
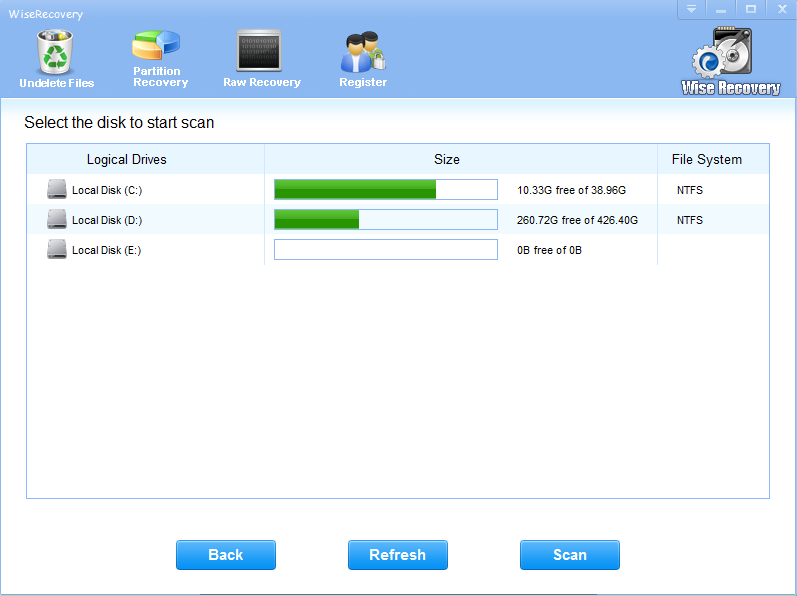
  • Easy to use, no special user skills required
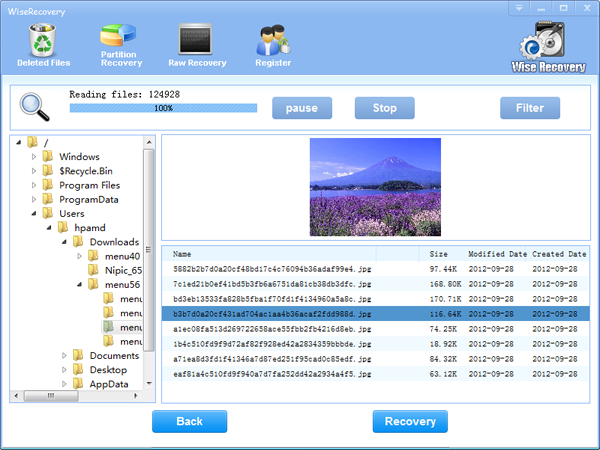
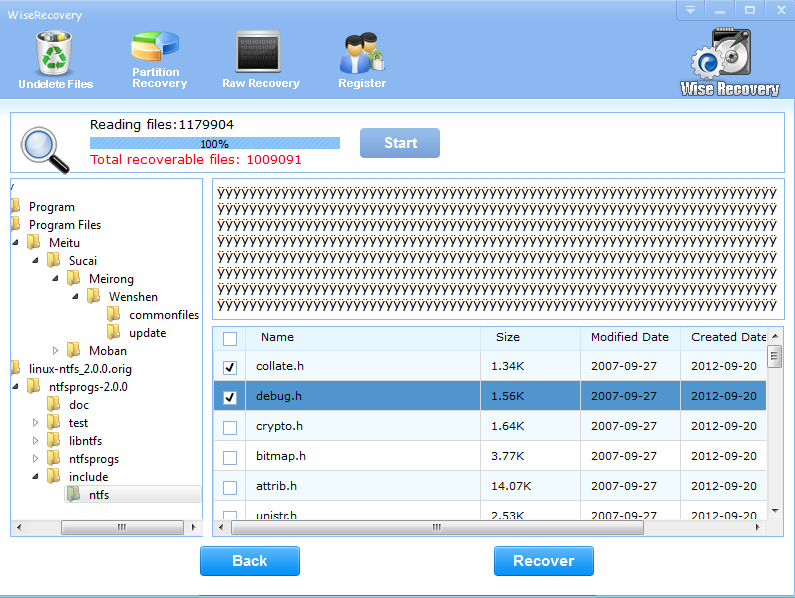
  • Display of recoverable photos or files as thumbnails
  • The recovery process is safe and risk-free
  • Camera, SD card, Memory Card, Cell Phone, USB, PC, MP3 and more.


To recover lost word files is not difficult if you use WiseRecovery. WiseRecovery can do a good job in digital media files recovery. It cannot only recover all the common file formats, but also recover some uncommon ones. During the process of scanning, it discovers your lost media files automatically and sorts them into different categories according to format, which will help you find the files you want easily.


How to Recover Lost Data From XD Card

What is XD Card?

XD cards are common memory cards which are usually applied in digital cameras. They are most common in Olympus and Fujifilm cameras. XD cards are used to store picture and video files and can transfer these files onto your computer’s internal hard drive, or onto a portable storage device like a flash drive. In order to transfer pictures and videos from an XD card onto your computer, you will need an XD card reader, which your computer may have or which you can purchase at an electronics store. If you accidentally delete files from your XD card, while formatting them, for example, you can recover them with a downloaded data recovery program. However, what if accidently delete photos from XD card? Mistakenly press “format” in your digital camera?

All of us know the photos contain important memory of our life. If the photos of XD card are missing or deleted unintentionally, we will feel extremely upset. Don’t worry. We will introduce you how to recover lost photos from XD card.

Then how to recover lost photos from XD card?

In this article, we will provide you an efficient and effective method.

For Novice Computer User

WiseRecovery is an easy-to-use card recovery software that can effectively recover deleted or lost photos, music, video, and multimedia files from almost all digital cards after instances like deletion, corruption and formatting, etc, which is Professional Memory Card Recovery Software, Recover Lost or Deleted Photos in 3 Steps.

STEP 1 Download Card Recovery Tool & Install it for free. . ( Note: If the download link doesn’t work you may need to Download it from a Download Mirror).


STEP 2 Run the WiseRecovery software. Click [Start Scan], specify the drive letter, file type and destination location. Then click [Next] to start the scan.


STEP 3 When the scan is finished, select the files you want and click [Recover] button to restore the files..


How to Recover SLR Camera Photos

As the development of living condition, more and more people pay much attention to spiritual function of a product, and they do not care much about physical function now.

Lots of people prefer to spend much money on purchasing an SLR camera. They care much about the quality of their photos. Therefore, the photos are important for them.

Once it was deleted by accident, people want to find the most efficient way to find their photos back. Although there are various recovery software in the market, the software which can recover the SLR camera photos can seldom be found.

WiseRecovery can recover the SLR camera photos easily.

WiseRecovery is easy-to-use card recovery software that recovers deleted/lost photos, music, video, and multimedia files from almost all digital card sources after disasters like deletion, corruption, formatting. The program enables the quick recovery of photos from different storage devices in just a few steps.

WiseRecovery acts the most important role in the recovery software market, which is famous software that helps you recover lost data from Hard Drives, PCs and Laptops, Memory Sticks, USB storage media, SD card, cameras, cell phones or other storage media. It performs read only operation and will never do any damage to your card or hard drive. WiseRecovery also can recover your deleted or lost files due to situations of corruption, formatting, virus attack, etc. With WiseRecovery you don’t need to worry about your lost data any more.

STEP 1Download WiseRecovery & Install it for free. . ( Note: If the download link doesn’t work you may need to Download it from a Download Mirror).

STEP 2 Run the WiseRecovery software. Click [Start Scan], specify the drive letter, file type and destination location. Then click [Next] to start the scan.

STEP 3 When the scan is finished, select the files you want and click [Recover] button to restore the files.

How to Restore an Acer Aspire One Computer

With most laptop computers, you can restore the OS back to factory settings by using a recovery disk. The Acer Aspire One series of netbooks do not have an optical CD or DVD drive, so a recovery disc is not an option. Instead, the Aspire One series includes a built-in partition on the hard drive that already has all of the recovery information. You can quickly restore your Acer netbook back to its original condition by accessing the partition and running the recovery tool

Method A:


  1. Consider what data you still need from your Acer Aspire One’s hard drive. Save the files to an external USB device.
  2. Restart the Acer Aspire One’s operating system. Wait for the Acer logo to appear on the LCD screen.
  3. Press the “Alt-F10″ keys at the same time to bring up the recovery menu. Press “Enter.”
  4. Click “Next.” Follow the prompts that appear on the screen to restore the operating system back to factory settings.
  5. Use the drop-down boxes to select the time zone and language information for your Acer Aspire One. Restart the netbook when you are prompted to finish restoring the computer.
  6. Connect the external USB device to your Acer Aspire One and transfer the data you saved earlier back to the netbook.


Method B:


It is important to use the right recovery software. Some undelete programs are designed only to restore photos which have been deleted.  While some others can not only recover photos undeleted but also those corrupted, lost or formatted. Here I recommend WiseRecovery to you. WiseRecovery can do a scan and show the photos need to be recovered so that you can choose which one you need to recover. This makes the recovery more efficient and convenient!

WiseRecovery provides an effective memory card data recovery solution to recover data after memory card format. It helps computer users to recover images, audios, videos, and other multimedia data from formatted memory cards under Windows 2000/XP/2003/Vista/2008/7/8.


  1. Download WiseRecovery here
  2. http://www.wiserecovery.com/download.php
  3. Install it and launch it. Click the “Start Scan” button on the main window of WiseRecovery.
  4. You can see the list of all volumes found on your computer, select the exact drive and click the “Next” button to start scanning. If you can’t see the drive, please make sure your external drives are connected, and click ‘Refresh’ button.
  5. It will take about 2-10 minutes to scan, it depends on your disk size and files amount on the disk. After scanning is finished, you can preview text document and picture files.
  6. http://www.lionsea.com/

How to Recover Sent Email

Email providers understand that sometimes it can be difficult to find old emails, especially if they were sent months or even years before. To make it easy for you to recover sent emails, email providers such as Hotmail, Yahoo! and Google provide email search engines and filters to find sent emails.

Method A:


  1. Find the “Search Mail” tab, which is only accessible from your email page. Log on to your email account using your user name and password. For Gmail accounts, the tab is located at the top-left side of the email page. The phrase “Search Your Email” may also be used.
  2. Enter a phrase, subject line, recipient name, email address or key word that can be used to identify the sent email. Type the information into the searching box.
  3. Hit “Go,” “Enter” or click on the search mirror icon. The system will search file folders, saved emails, sent emails and emails that are currently marked for deletion in your Trash folder.
  4. Browse the results. Multiple emails may be tagged if the keyword you use is very common. Narrow your search if there are too many results to browse.
  5. Setting Up a “Sent” Folder
  6. Click on the “Settings” link on your email page. Log in to your email account to access your email page.
  7. Set up a filter for sent emails. Choose to save a copy of each sent message in the Sent folder by checking the appropriate box.
  8. Click “Save Changes” to save the changes and return to your Inbox. Once this feature is in place, you can recover future sent emails by clicking on the “Sent” folder and browsing sent emails there.
  9. Browse sent emails by date, subject line or recipient.
  10. Click on the sent email you wish to recover. Wait for the email message to load. Forward or print, if necessary.


Method B:


It is important to use the right recovery software. Some undelete programs are designed only to restore photos which have been deleted.  While some others can not only recover photos undeleted but also those corrupted, lost or formatted. Here I recommend WiseRecovery to you. WiseRecovery can do a scan and show the photos need to be recovered so that you can choose which one you need to recover. This makes the recovery more efficient and convenient!

WiseRecovery provides an effective memory card data recovery solution to recover data after memory card format. It helps computer users to recover images, audios, videos, and other multimedia data from formatted memory cards under Windows 2000/XP/2003/Vista/2008/7/8.


  1. Download WiseRecovery here
  2. http://www.wiserecovery.com/download.php
  3. Install it and launch it. Click the “Start Scan” button on the main window of WiseRecovery.
  4. You can see the list of all volumes found on your computer, select the exact drive and click the “Next” button to start scanning. If you can’t see the drive, please make sure your external drives are connected, and click ‘Refresh’ button.
  5. It will take about 2-10 minutes to scan, it depends on your disk size and files amount on the disk. After scanning is finished, you can preview text document and picture files.

http://www.lionsea.com/


How to Recover an Uninstalled Program

When you uninstall a program on your desktop or laptop computer, there may come a time when you need to use the program again. Fortunately, you can use Microsoft’s “System Restore” to revert your computer to a time when the program was installed on your computer. System Restore routinely creates “checkpoints” and creates images of your computer’s state, including installed applications. After you restore your computer to a date before you uninstall the program, you will be able to use the program again. Programs can be deleted by accident or because you think you don’t need to use them anymore. Computers have three ways of restoring deleted programs, depending on the type of program it is. You can restore a program from the trash bin if it has not been permanently deleted yet, use the system restore and use an advanced recovery. These methods apply to Windows Vista and 7.

Launch System Restore by right-clicking “My Computer,” selecting “System Protection” and then “System Restore.”

Click “Next” in the window titled “Restore system files and settings.”

Select a restore point that is earlier than the date that you removed the program. Click “Next” again. The computer will restart and restore the removed application.

Method B:


It is important to use the right recovery software. Some undelete programs are designed only to restore photos which have been deleted.  While some others can not only recover photos undeleted but also those corrupted, lost or formatted. Here I recommend WiseRecovery to you. WiseRecovery can do a scan and show the photos need to be recovered so that you can choose which one you need to recover. This makes the recovery more efficient and convenient!

WiseRecovery provides an effective memory card data recovery solution to recover data after memory card format. It helps computer users to recover images, audios, videos, and other multimedia data from formatted memory cards under Windows 2000/XP/2003/Vista/2008/7/8.


Download WiseRecovery here

http://www.wiserecovery.com/download.php

Install it and launch it. Click the “Start Scan” button on the main window of WiseRecovery.

You can see the list of all volumes found on your computer, select the exact drive and click the “Next” button to start scanning. If you can’t see the drive, please make sure your external drives are connected, and click ‘Refresh’ button.

It will take about 2-10 minutes to scan, it depends on your disk size and files amount on the disk. After scanning is finished, you can preview text document and picture files.

http://www.lionsea.com/

How to Perform a Dell System Restore

Modern Dell laptops are designed with a built-in feature that restores your laptop’s operating system to its original configuration. In essence, it enables you to restore your computer system to the state in which it was shipped. This can be helpful if you are upgrading and giving the laptop to someone else or if you run into problems with the operating system.

Method A:


Back up all data that you want to save. Once you reformat and restore the computer, all existing data will be completely erased. This includes any email, program files and drivers. Save your Documents folder.

Disconnect all peripherals — printer, modem, USB — from the computer, leaving only your monitor, mouse and keyboard.

Reboot your computer. As it boots up, press and hold the “F8″ key until you see the Advanced Boot Options menu. If you see the Windows logo appear, restart the computer and try to enter the Advanced Boot Options menu again.

Use the down arrow on your keyboard to choose “Repair Your Computer.” Press “Enter.”

Log in with an administrator account and click “OK.”

Click “Dell Factory Image Restore” on the screen that appears and then click “Next.”

Click “Yes” to confirm that you want to restore the laptop to its factory settings and click “Next.”

Click “Finish” to reboot your computer after the restore process has finished. Your hard drive is now restored to its original configuration.

Reinstall any applications and files that you want on the laptop.


Method B:


It is important to use the right recovery software. Some undelete programs are designed only to restore photos which have been deleted.  While some others can not only recover photos undeleted but also those corrupted, lost or formatted. Here I recommend WiseRecovery to you. WiseRecovery can do a scan and show the photos need to be recovered so that you can choose which one you need to recover. This makes the recovery more efficient and convenient!

WiseRecovery provides an effective memory card data recovery solution to recover data after memory card format. It helps computer users to recover images, audios, videos, and other multimedia data from formatted memory cards under Windows 2000/XP/2003/Vista/2008/7/8.


Download WiseRecovery here

http://www.wiserecovery.com/download.php

Install it and launch it. Click the “Start Scan” button on the main window of WiseRecovery.

You can see the list of all volumes found on your computer, select the exact drive and click the “Next” button to start scanning. If you can’t see the drive, please make sure your external drives are connected, and click ‘Refresh’ button.

It will take about 2-10 minutes to scan, it depends on your disk size and files amount on the disk. After scanning is finished, you can preview text document and picture files.

http://www.lionsea.com/

How to Recover Lost Files

Anyone who has ever used a computer for any length of time has experienced the stomach-dropping feeling of losing important files through bad karma or use Delete key discretion. Sometimes, though, what’s lost can be found again.

Method A:


  1. Double-click on the Recycle Bin in Windows or the Trash on Mac to see if the file is still there.
  2. If you find the file, drag it to the desktop. Return the file to its original location in Windows, click on the file and select Restore from the drop-down menu.
  3. If the file is no longer in the Recycle Bin or Trash, look for backup. If your PC is on a network that has regular backups, check with the system administrator to see if it is possible to retrieve the saved copy of the file.


Method B:


Try using a commercial file-recovery utility that scans the disk for recognizable data (you can buy one for less than $100). When you delete a file, the operating system probably won’t erase the actual bits from the disk until it needs them for something else; therefore, you may be able to recover some data.


WiseRecovery is a good choice. WiseRecovery is a powerful data recovery software which can help you recover almost all kinds of data loss. With it your files, photos or important documents are safe even if there is something wrong with your computer.

  1. Download WiseRecovery here: http://www.wiserecovery.com/download.php
  2. Run WiseRecovery software, and click on Start scan.
  3. Choose the drive to start scanning.
  4. Now, the scanning process will commence. After scanning, list of file types will be displayed in the left pane.
  5. Click each file type to view files in it. You will see thumbnails when you click on the file type.
  6. You can either recover all or selected files by clicking the Recovery button.


Professional Data Recovery Software, Recover Lost or Deleted Files in 3 Steps

http://www.lionsea.com/


How to Recover Lost Files Due to a Virus

Safe mode is an operating environment that provides only the most basic system tools and hardware drivers. This environment is used to restore programs and files lost due to various reasons, including a virus attack. The process of recovering lost data in safe mode requires the use of System Restore, which restores all applications and files to a previously saved state. System Restore points created any time a system-level change is made, and contains a number of deadlines for system recovery.

Method A:


  1. Restart the computer.
  2. Press the F8 key just prior to the presentation of the Windows booting logo.
  3. Select “Boot into Safe Mode” using the arrow keys from the menu provided.
  4. Click the “Start” button located in the lower left corner of the Windows desktop.
  5. Type “System Restore” into the “RUN” textbox in the lower portion of the “Start” menu that appears.
  6. Select “Restore my computer to an earlier time” from the menu that appears. A list of potential restore points appears.
  7. Select a restore point that was created prior to the virus infestation from the list and click the “Next” button.
  8. Click the “Next” button on the restore point confirmation page. This begins the restoration of applications and files to the point in time selected in the restoration point list. The computer reboots into a normal operating system environment upon completion.


Method B:


WiseRecovery is a good choice. WiseRecovery is a powerful data recovery software which can help you recover almost all kinds of data loss. With it your files, photos or important documents are safe even if there is something wrong with your computer.

  1. Download WiseRecovery here: http://www.wiserecovery.com/download.php
  2. Run WiseRecovery software, and click on Start scan.
  3. Choose the drive to start scanning.
  4. Now, the scanning process will commence. After scanning, list of file types will be displayed in the left pane.
  5. Click each file type to view files in it. You will see thumbnails when you click on the file type.
  6. You can either recover all or selected files by clicking the Recovery button.


Professional Data Recovery Software, Recover Lost or Deleted Files in 3 Steps


http://www.lionsea.com/


How to Recover E Drive

So many of us have personal computers at home in our day to day lives. Our actions are our own computer account Personal Information tools for the preparation of tax adviser, music DJ and photographer. Our lives will be supported on our personal computers. What is the worst thing that can happen? Do you have a hard drive crash? It’s natural to feel stressed and afraid of the situation. I prepare for the hard drive. The first thing that may come to your mind is how to recover hard drives.

Many services are available to help you to recover data from the hard disk. With the help of them you can be assured that you are in capable hands with the E drive on the computer is usually an optical drive. Recovering this drive is necessary where the optical drive on your computer no longer functions as expected, resulting in error messages or other system problems. Accomplish this by uninstalling and reinstalling the drive to the system, recovering it in the process by eliminating the corruption in the installation files.


Method A:


  1. Click “Start.” Type “Device Manager” in “Start Search” and press “Enter.”
  2. Click “CD/DVD Drives” and select the drive that is your E drive.
  3. Click “Driver” and click “Uninstall.” Press “Yes” to confirm.
  4. Restart the computer. The E drive will be automatically reinstalled as the computer reboots, overwriting the faulty files causing the issue.


Method B:


WiseRecovery is a good choice. WiseRecovery is a powerful data recovery software which can help you recover almost all kinds of data loss. With it your files, photos or important documents are safe even if there is something wrong with your computer.

  1. Download WiseRecovery here: http://www.wiserecovery.com/download.php
  2. Run WiseRecovery software, and click on Start scan.
  3. Choose the drive to start scanning.
  4. Now, the scanning process will commence. After scanning, list of file types will be displayed in the left pane.
  5. Click each file type to view files in it. You will see thumbnails when you click on the file type.
  6. You can either recover all or selected files by clicking the Recovery button.

 http://www.lionsea.com/

Professional Data Recovery Software, Recover Lost or Deleted Files in 3 Steps